

How To Make An Image A Background In Xcode
Creating a Fullscreen Background Paradigm in SwiftUI — Beginner Tutorial
Space Travel App — Part 1
Howdy my proper noun is Izzy and in this tutorial I will show you how you tin add together a fullscreen background paradigm to your SwiftUI app with overlaying elements. This tutorial is aimed at beginners with pace-by-step instructions to follow along.
Prerequesits
- Mac with XCode 12 installed
- Feel in Swift programming not necessary but tin brand your life easier
The Concept
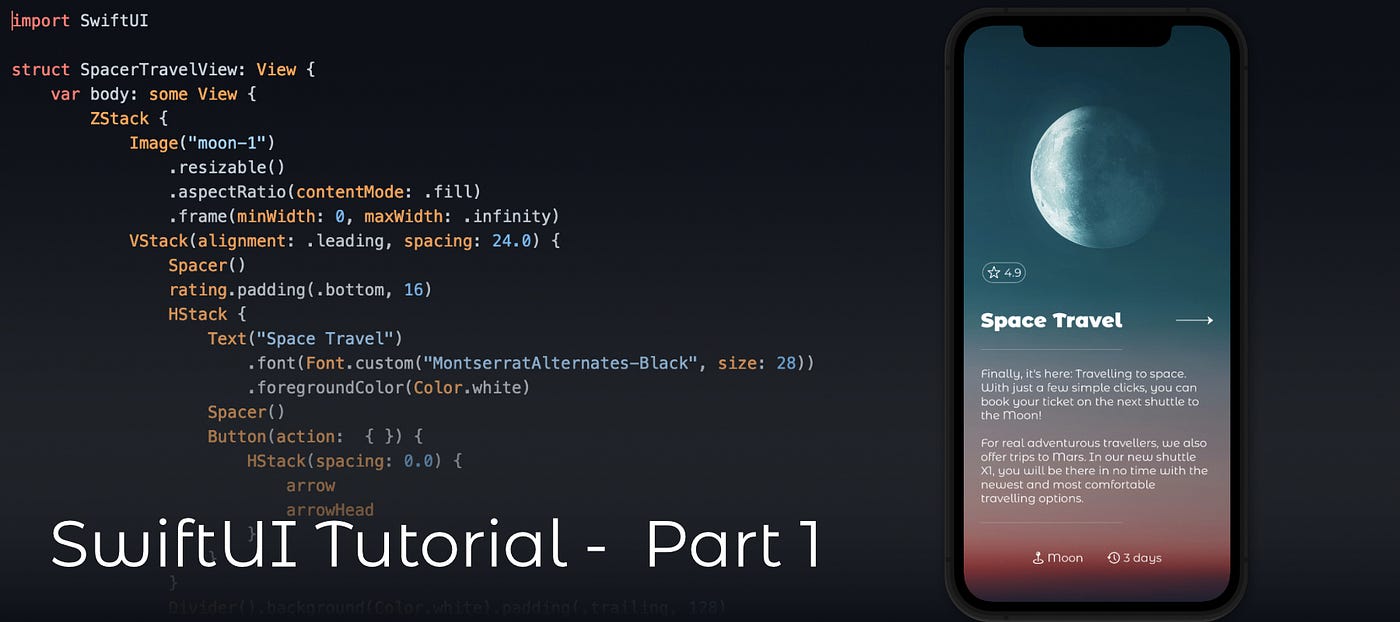
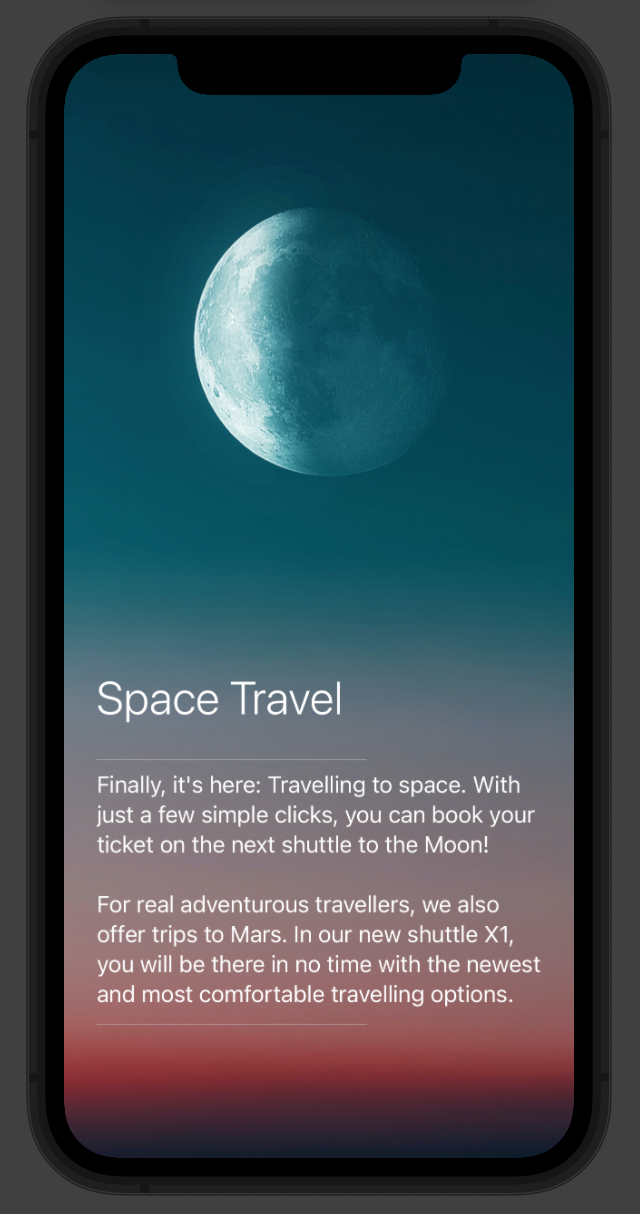
Before nosotros dive right in, I want to prove yous the final design. Having an idea of the final design makes writing the code in SwiftUI much easier.
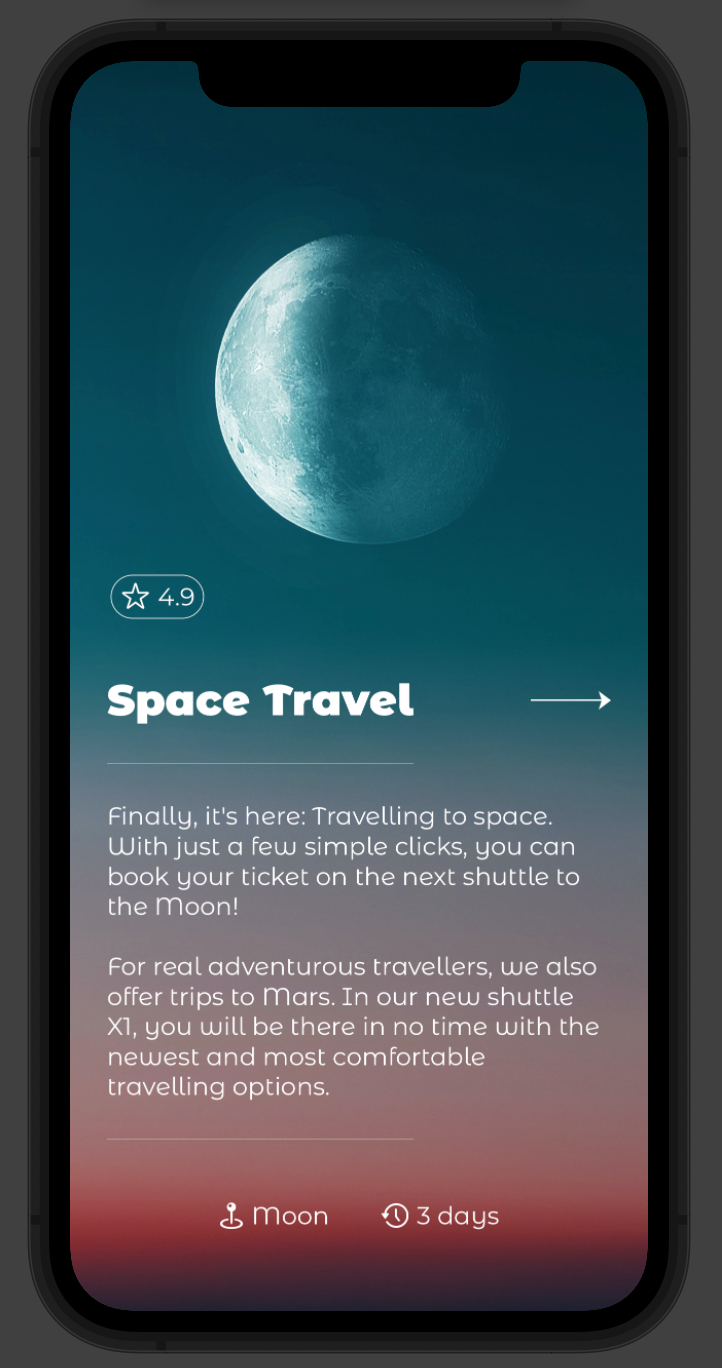
As an example app we will work on a screen for a travel app, but non only whatsoever travel app! We volition create a screen for a space travel app 🚀.
The screen is actually rather simple: We take one background image that spans over the whole screen and we take some text overlaying information technology, which is separated by two horizontal divider.
There are three things in this screen, which I won't cover in this tutorial only in following tutorials:
- SFSymbols and Shapes
- Custom Fonts
- Custom Shapes (arrow)
All of these are a little bit more advanced and therefore deserve their own tutorial.
Getting Started
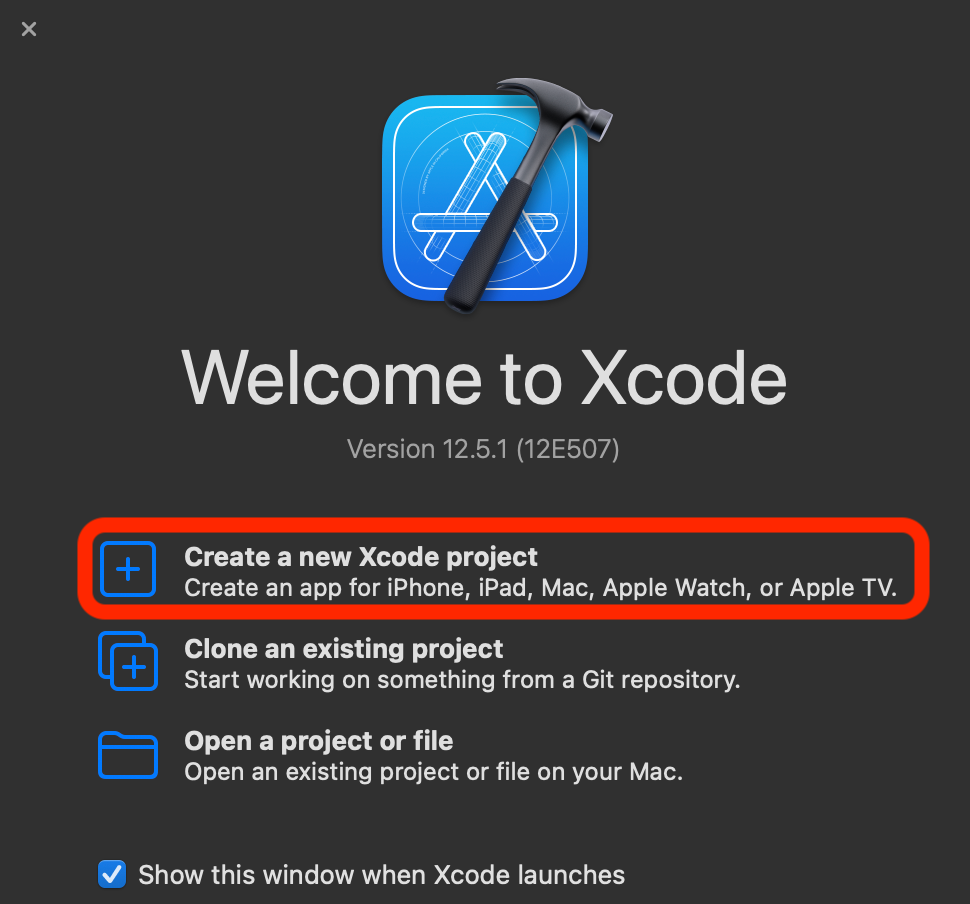
Open up XCode and you should exist greeted past a small-scale Splashscreen, which allows us to create, for example, a new project, or go along working on one of our existing projects. For this tutorial we will create a new XCode project.
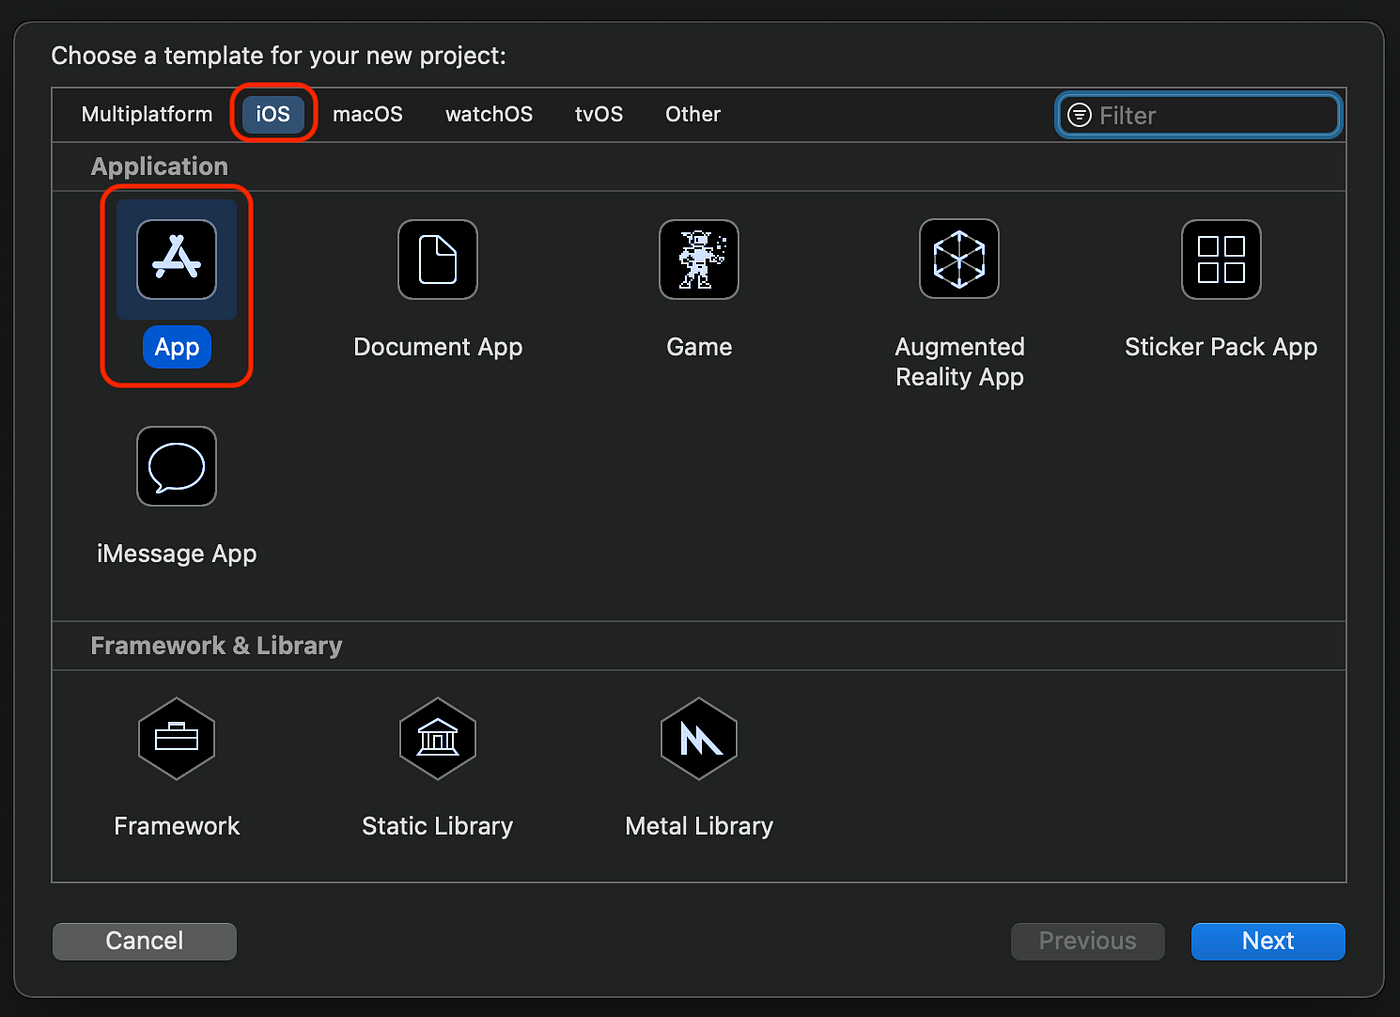
This will open up upwardly XCode and greet us with a small-scale row of dialog windows to configure our project farther. First of, we have to choose the platform we desire to develop our app for. In this case we will go for an iOS App.
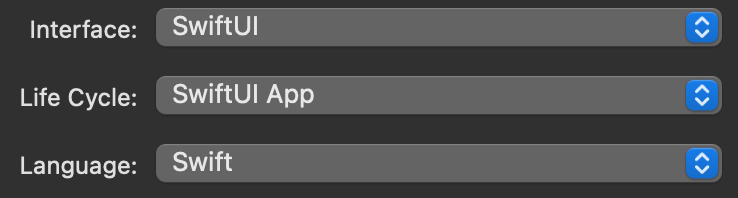
Select App and then click on Next . In the side by side window we volition be asked for a Product Proper noun, this will be the name of our app. I will call my app " Space Travel ". For the system identifier, you can choose what always you want. If you accept your own website, like "example.com" you could write "com.example" every bit the identifier. Additionally, make certain y'all have the Interface and Life Bike set to SwiftUI and the Linguistic communication set to Swift .
After clicking Next we will be asked for a location where we want to save our project and then XCode will generate all the files nosotros need to go started. Your screen should at present look similar to the following:
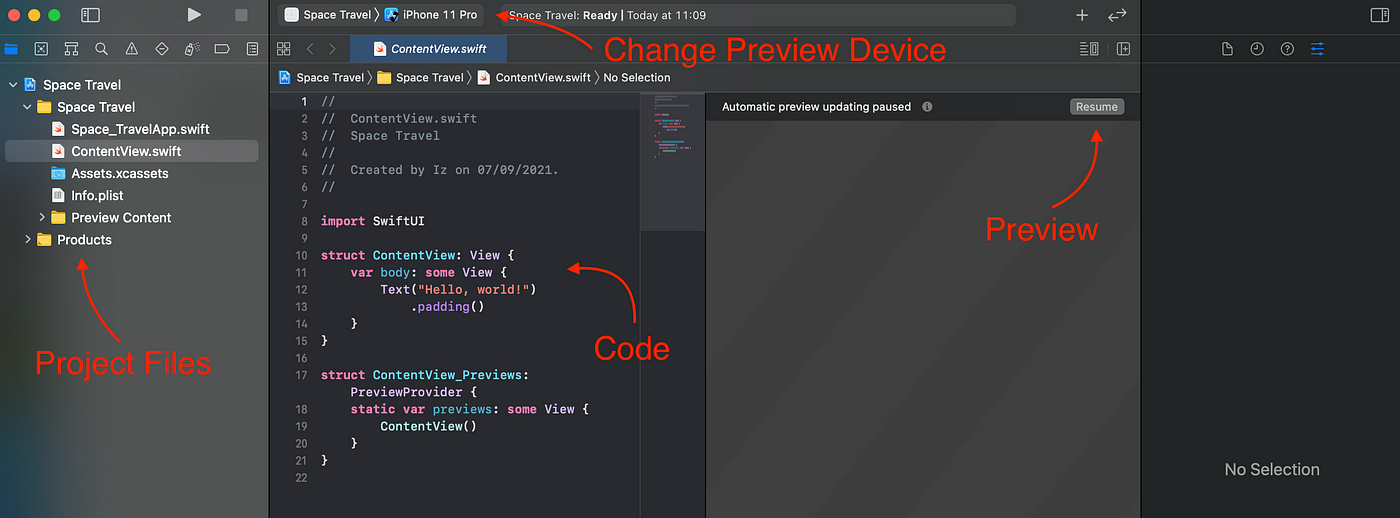
- on the left side nosotros take all our projection files
- beside it on the right we accept the area where we can code
- and side by side to that is the preview surface area. Here nosotros just have to click on "Resume" (which tin load a bit for the commencement time) and and so we will see a preview of our app
- in the top bar y'all can also change the device on which you desire to preview your app
The Blueprint
Fullscreen Background Epitome
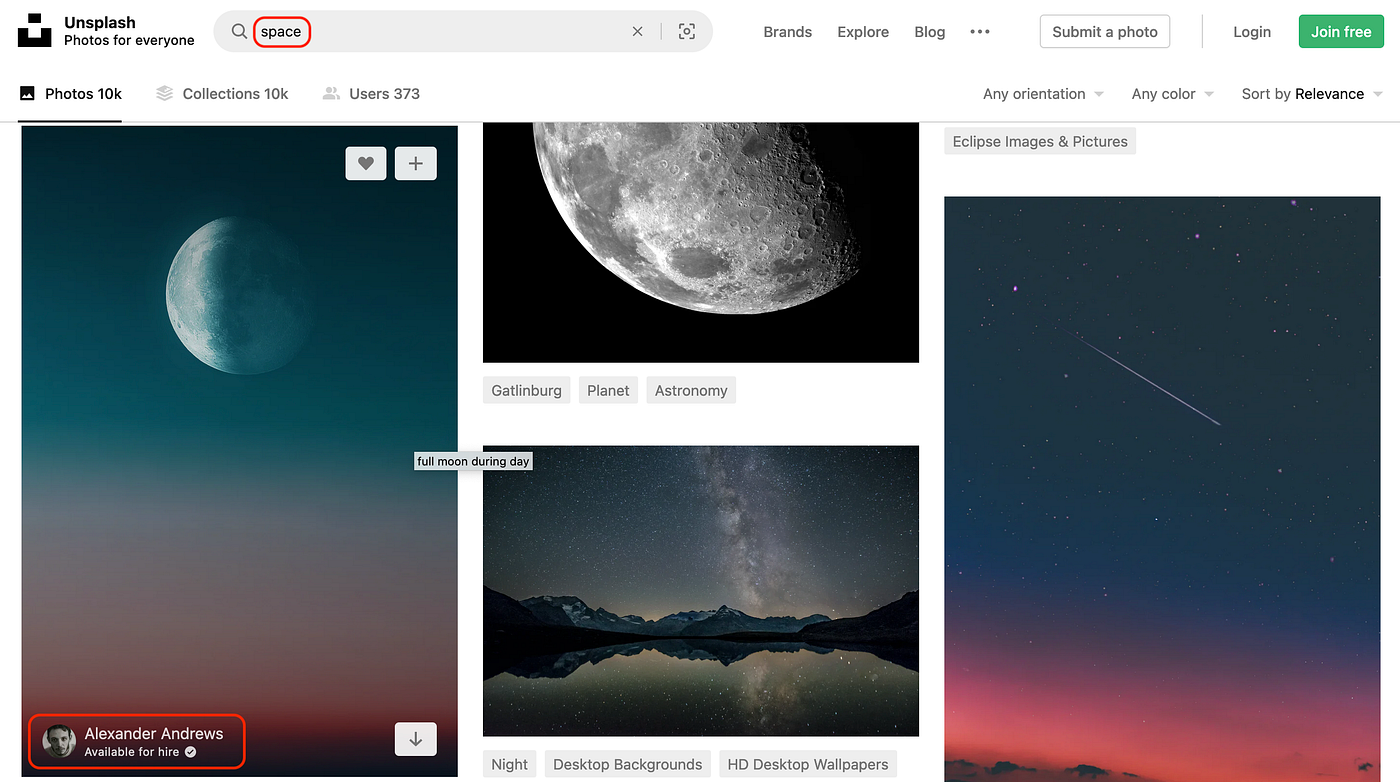
Before we can add a groundwork epitome to our app, we need the film. I like to use the website unsplash.com: It has millions of 100% gratis to employ pictures, perfect for our app. I searched for "Space" and found a bully picture from Alexander Andrews. You tin can download the aforementioned moving picture hither.
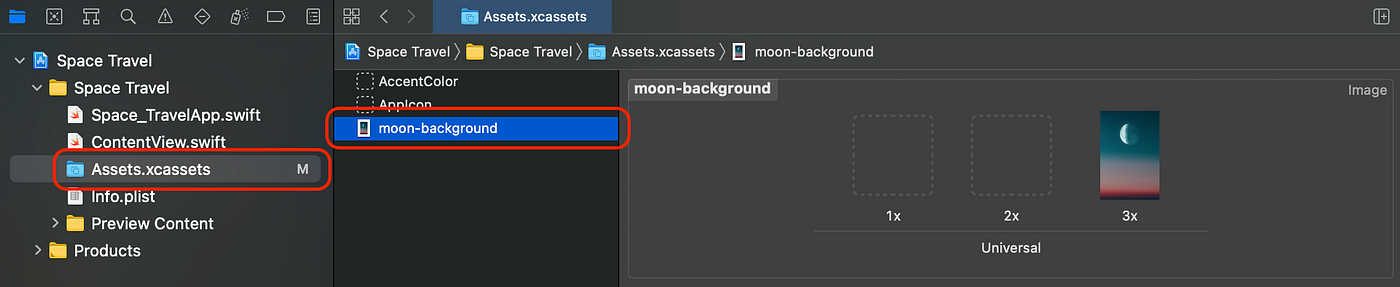
Download the picture and salvage information technology somewhere where you can find it easily again. Now in XCode open up Avails.xcassets and drag your picture from Finder underneath AppIcon and AccentColor . A practiced idea would as well exist to rename it to something you can hands type and call back, I went for " moon-background ".
Lets get back into ContentView.swift and then we tin can finally add our picture. There are multiple means how we can add a picture in SwiftUI. For case, if you are familar with writting SwiftUI apps you might know exactly what code snippet you need. If y'all are merely starting out, information technology might exist easier getting the element yous desire from the library.
Commencement click the niggling plus sign in the elevation bar to open up the view library. This will open a minor modular window with all the different kind of views that we can direct use. Each of the views likewise has some text and caption on the right that helps us setting everything up.
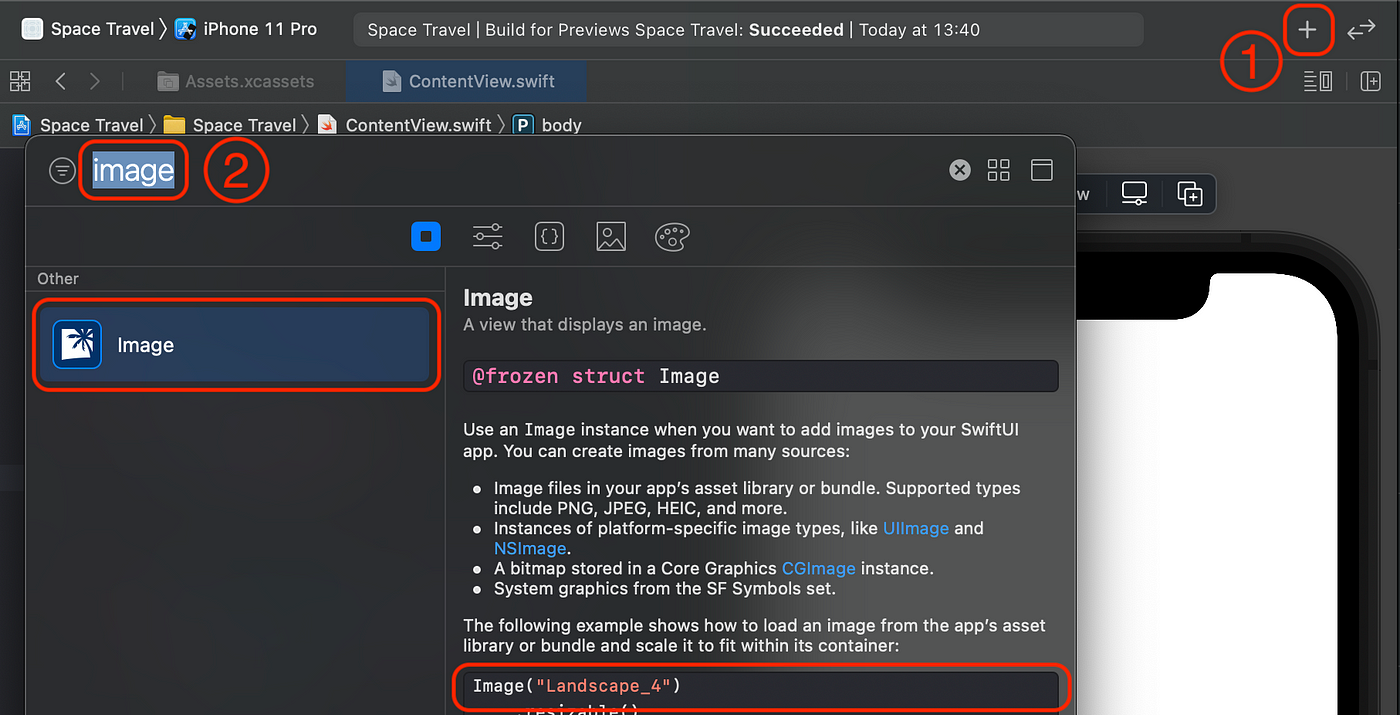
Search for image and and then scroll downward a scrap in the text to see the example usage. Yous tin now either drag and drop the image into your code or onto the screen to place it relative to the text, or we can just go alee and write the code by ourself, now that we know how to add an Image.
Let's remove the Text("Hullo World").padding() and instead add together our image. The string that we laissez passer every bit an argument is the proper name of the image that we defined when we added it to Assets.xcassets in my instance " moon-groundwork ".
The image covers nicely all of the screen but it seems to be even bigger than the actual screen and some parts of the prototype are not even visible. If we get back into the library we can find out pretty rapidly why:
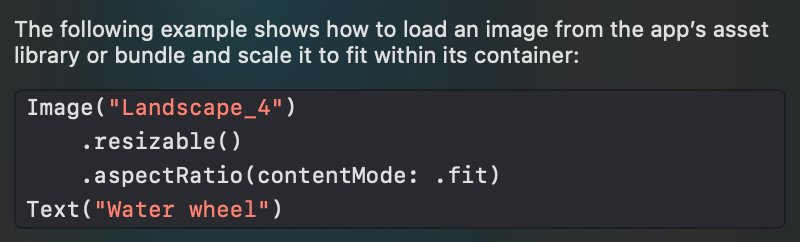
In the example, there are ii more functions added to the epitome. The outset 1 resizable() allows the prototype to modify size and squeezes it into the screen. This ignores the original aspect ratio of the image which is non necessarily dainty. Thats why we add together equally a second role the aspectRatio() function. This function tells SwiftUI to go on the original aspect ratio of the image. Here we tin can pass two arguments:
- .fit : fits the epitome into the parent container and leaves white spaces if necessary
- .fill : fills the parent container with the image and cuts off parts of the epitome if necessary → this is the one we want to utilise in this case
Our lawmaking should look like this after adding the functions:
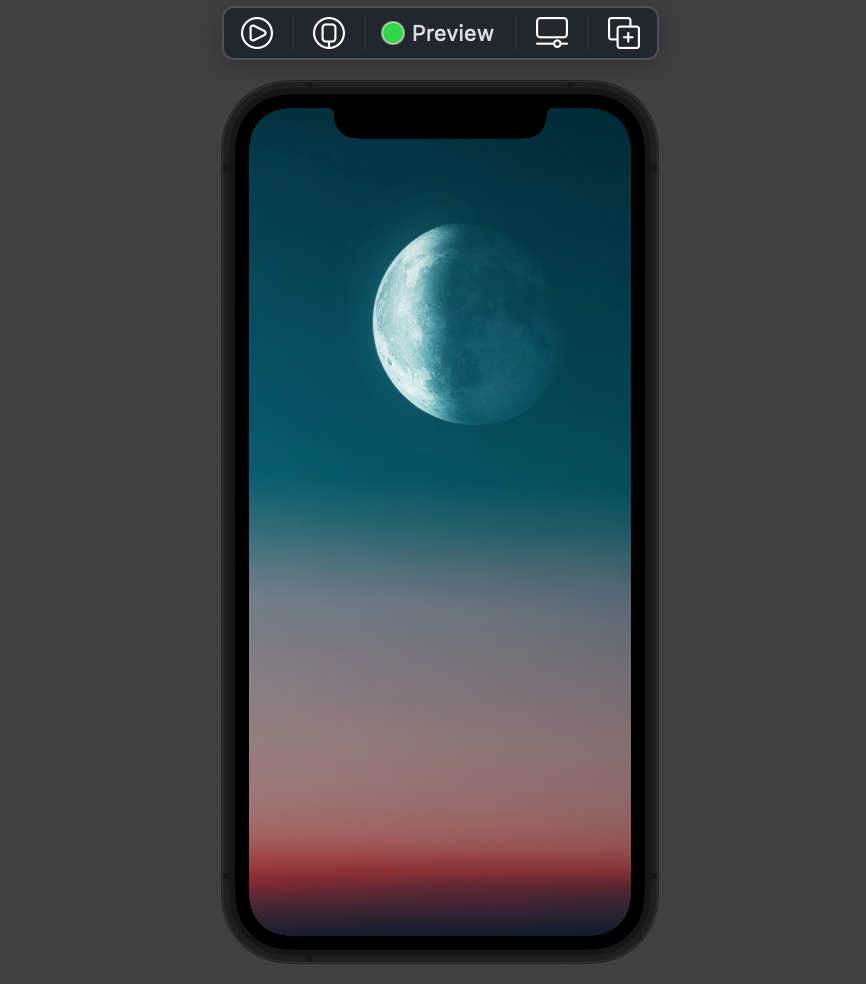
If you check the preview you will see that the paradigm is already nicely stretching over the screen but there are yet 2 white arrays at the top and bottom which are in the style. These are called "Safe Area" and nosotros can tell our paradigm to ignore them, with the part .edgesIgnoringSafeArea(.all) .
With that our image will fully stretch over the screen 😊. Your preview should look similar to this:
And the final code for the image should wait similar this:
Agreement Stacks in SwiftUI
Earlier we can identify the text on the image we demand to understand how stacks works in SwiftUI and how they can help us organize views. There are iii different Stacks we can use: HStack (horizontal), VStack (vertical) and ZStack .
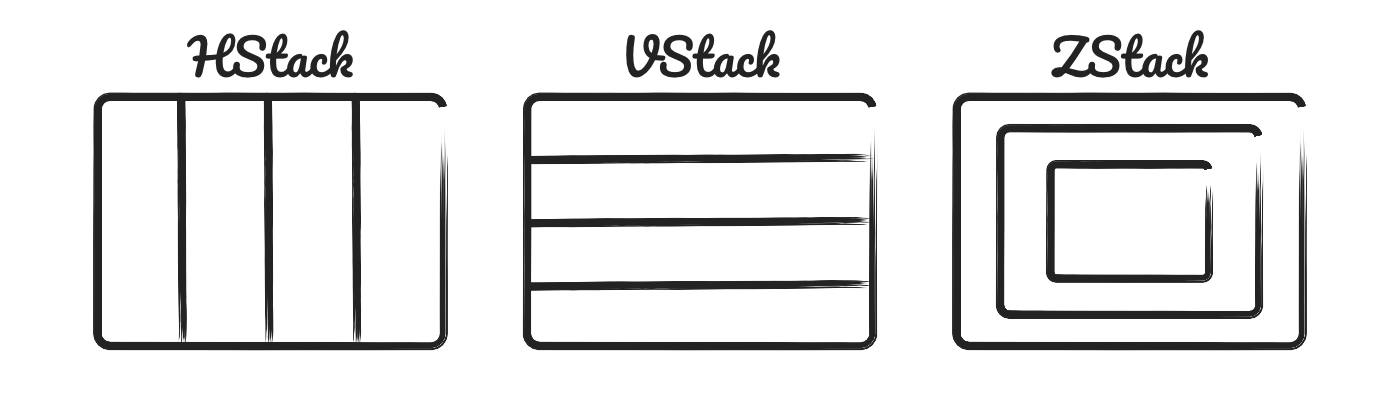
- HStack : Places multiple views adjacent to each other
- VStack : Stacks views in a vertical social club above each other
- ZStack : Allows to overlay a views with others
We want the text to be above the picture, which is a prefect utilize case for the ZStack . The text and dividers are all vertically underneath each other, prefect for a VStack .
Text & Dividers
To add the text above the image we need a ZStack. We tin can either search for it in the library similar we did with the image or employ a neat little shortcut.
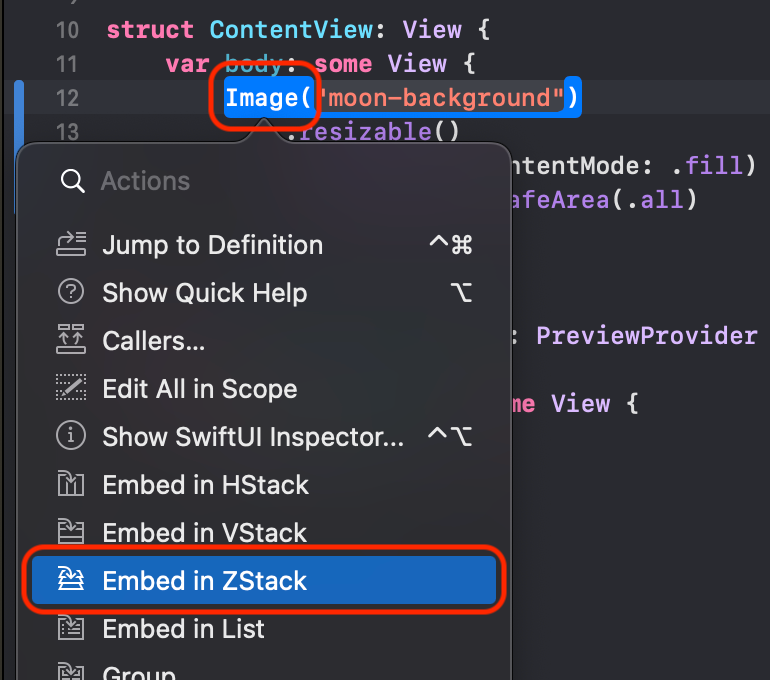
Press command ⌘ and left click on the Image in your code. This will open upward a small pop up window which allows us to embed our image in a new view. Hither nosotros tin cull Embed in Zstack , which will wrap the ZStack effectually our Image .
Now we can add a Text view correct underneath the paradigm code only in the ZStack{} and it will announced on meridian of our image. But add Text("Infinite Travel") after the .edgesIgnoreSafeSpace(.all) role.
The text is perfectly on superlative of the image just we want another longer text underneath it surrounded by ii dividers. Permit command ⌘ and left click on the text and embed it into a VStack , so we can add farther elements beneath information technology. And then add Divider() for a horizontal line, some other Text("…") and in the end one more Divider() . The code should await like this:
If you bank check the preview, you might be a bit disappointed. Right at present information technology doesn't really look like a squeamish app. To be precise there are multiple bug, but as you will see, all of them we tin can fix very hands and fast.
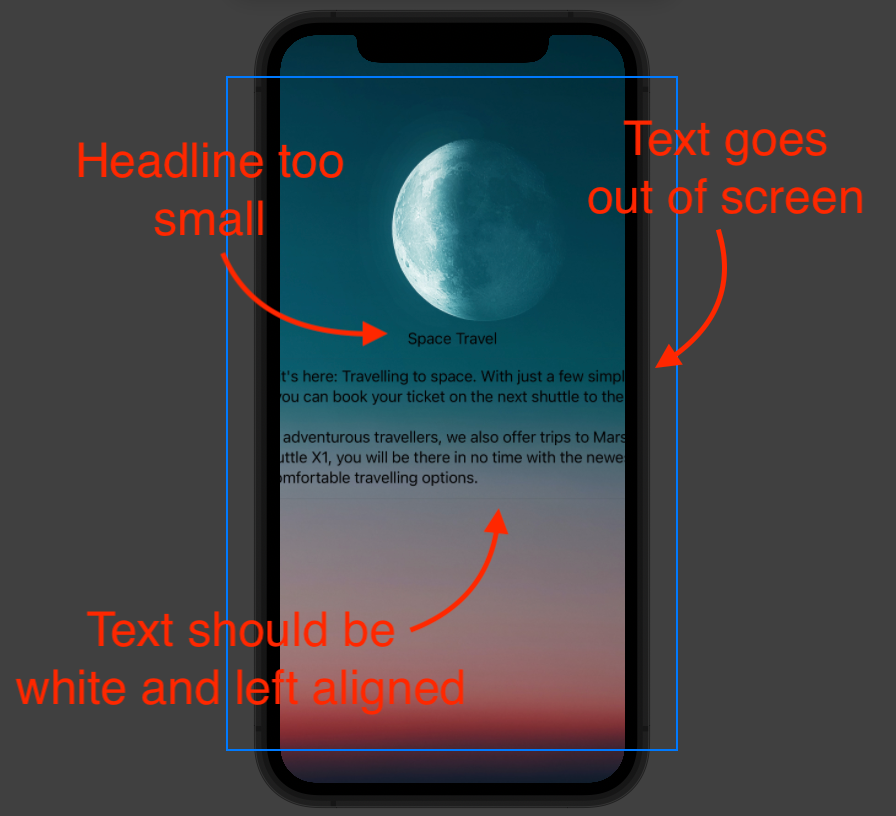
What we need to do:
- Fix the problem of text running out of the screen
- Change Text and Divider color to brand them more visible and easier to read
- Change the alignment of the text to align it all on the left bottom
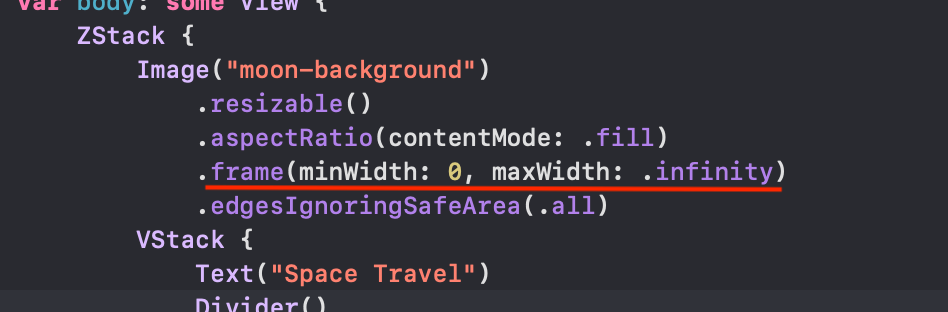
Lets start with the biggest problem: the text seems to exist ignoring the stop of the screen and merely leaves the screen. If you select the background image you tin see really fast why. When you select the groundwork image in that location should be a blue frame indicating the frame of the image (too shown in the screenshot above).
The blue frame is basically the space where all other items will be added to. This means the text will stretch from the left side of the blue frame to the right. To set this we just have to tell the frame of the picture to fit to the width of the screen, and nosotros can practice this simply by adding .frame(minWidth: 0, maxWidth: .infinity) to our paradigm.
At present our text is nicely wrapped in the screen. Maybe a chip too nicely. Correct now our text really goes from i side of the screen to the other. Lets add together a bit of space to the edges, by adding a horizontal padding. Nosotros can add padding to every view, this means we could add together it just to a specific text or to the whole block by adding information technology to the VStack . Simply add .padding(.horizontal, 24) later on the closing curly bracket of the VStack and we should accept some squeamish infinite between the text and the screen sides.

Lets piece of work on the text appearance next. Similar to the padding we tin modify the color for each element separately. In this case, however, we want all of them to accept the same color, and then we tin can merely assign the VStack a white forground color. Add .foregroundColor(.white) to the VStack and the text should appear in white.
You may notice that the color of the Dividers is non changed by this. To alter the color of a divider we demand to alter their background color. If we would apply a background color to the VStack, it would apply a color to the whole frame. This would mean we wouldn't be able to read the text anymore if there would be a white background. So we will add the white background only to our Dividers by calculation .background(Color.white) [Line 11 & 13].
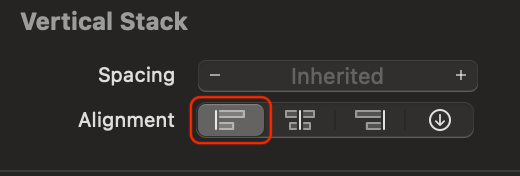
The concluding thing that is missing is the alignment. Outset left click on the VStack and on the right side in the properties modify the alignment to left.
Next add together a Spacer() before the first Text view in the VStack to push the text to the bottom. To elevator the text a bit upwardly, we can add another padding to the bottom of the VStack, by adding .padding(.bottom, 64) after our horizontal padding. We can too add some trailing padding to both of our Dividers which will brand them shorter and leave some space to the correct. Merely add .padding(.trailing, 128) to both of them.
Finally, we tin adjust the text a bit to end our design for this tutorial. If you lot select i of the text, you can run across multiple options in the properties pane on the correct. Lets change the headline to a Large Title font and its weight to Light . For the longer text underneath, we tin only change the weight to Light .
And this is it:
Congratulations! 👏 If yous managed to follow along, good job and I promise this gives you a better understanding of SwiftUI and how you tin create your own designs. Hither you can come across the full code:
Next Tutorials
I will write a few more tutorials to stop this design and will link them in this article every bit shortly as I publish them. Topics will include:
- working with SF Symbols and Shapes: Published, view here
- adding custom fonts
- creating custom Shapes
I hope you lot enjoyed this tutorial and if you lot have whatsoever comments nearly the general layout of the tutorials or any whishes for time to come tutorials feel gratis to let me know in the comments. 😊

How To Make An Image A Background In Xcode,
Source: https://ix76y.medium.com/space-travel-app-part-1-creating-a-fullscreen-background-image-in-swiftui-beginner-tutorial-ca6f950b3b8
Posted by: reynoldsfoure1965.blogspot.com
0 Response to "How To Make An Image A Background In Xcode"
Post a Comment